Calling AWS Lambda from PHP

Amazon Web Services (AWS) documentation is voluminous. Some of it’s good; some of it’s bad. And sometimes you have to look carefully to figure out that what you’re viewing is outdated.

Thus it was when I tried to figure out how to call a Lambda service from PHP.

I had created a web service in Java that was being deployed to AWS Lambda. We had connected it to an AWS API Gateway, figuring that a web service call to the API Gateway would be the easiest way to implement a client. Not so. Not in PHP at least.

I got the service working so that I could call it from Postman. But, when I tried calling it using PHP’s cURL library, I found that trying to calculate the signature required to pass the AWS Secret Key was a headache on good days, and would drive you to drink on bad. I can’t tell you why what I tried didn’t work. I only know that I kept getting Missing Authorization errors that I couldn’t overcome and still stay sane.

So I switched to using the AWS PHP library which, I guess, I should have used in the first place. But the documentation required numerous gotos that made it confusing to follow. There were no simple examples. There were no straightforward “here’s how it should look” instructions to follow. Eventually, however, I put the pieces together. And, hopefully, you can, too.

Starting with one example, I first worked out how to get the LambdaClient object I needed.

The first task was to get the credential information. Those who have developed for AWS on their own machines may have noticed that this information is stored in an .aws subdirectory under the user’s folders. The common way of retrieving the key and secret assume access to this subdirectory. The second way this is done assumes system variables with the values. My implementation could not make use of this method. So AWS allows for custom credential objects, which is what I used:

public function getCredentials() {
   return function () {
      // Get the credential variables
      $key = AWS_KEY;
      $secret = AWS_SECRET;
      if ($key && $secret) {
         write_log('credentials created');
         return Promise\promise_for(
            new Credentials($key, $secret)
         );
      }

      $msg = 'Could not find credential variables. ';
      return new RejectedPromise(new CredentialsException($msg));
   };
}

Since this is part of a WordPress site, the AWS_ variables are stored in the wp_config file.

The documentation recommends starting with an instance of the Aws\Sdk, then creating the client from there:

$sdk = new Aws\Sdk([
   'region' => REGION,
   'version' => 'latest',
   'credentials' => $this->getCredentials()
]);
$client = $sdk->createLambda();

… where $this->getCredentials() uses the function above.

Odd thing, though, is even after creating the client included passing credentials and location information, that was needed again when we actually made the call to the server. So I set up another function to hold that information:

public function config(){
   $config = array(
      'credentials' => array(
         'key'    => AWS_KEY,
         'secret' => AWS_SECRET,
      ),
      'region'  => AWS_REGION,
      'version' => "2015-03-31"
   );

   write_log('lambda config: ' . json_encode($config));
   return $config;
}

Yes, I know I was inconsistent with the versions. But, for this, I wanted to make sure I was using what I had programmed to, to ensure nothing broke later.

Last step was the actual call to Lambda:

public function sendMessage() {
   $client         = $this->getLambdaClient();
   $json_config = json_encode($this->config());

   $result = $client->invoke([
      'ClientContext' => base64_encode($json_config),
      'InvocationType' => 'RequestResponse',
      'FunctionName' => FUNCTION_NAME,
      'LogType' => 'Tail',
      'Payload' => json_encode($my_input)
   ]);

   write_log( $result);
   $log_unencode = base64_decode($result->get('LogResult'));
   write_log("unencoded log: " . $log_unencode);
   write_log("returned payload: " . $result->get('Payload'));

   return $result->get('Payload');
}

Interesting thing was needing to encode the configuration. Makes sense, I guess, since it’s sending login information. But that wasn’t required when creating the client object.

Also note the fact that the Payload needed to be in JSON format to be sent.

The result object that I wrote to the log was interesting to see. It didn’t include the Payload, which I thought was weird. So at first, not knowing how to get the results, I tried pulling the Cloudwatch log back to see whether I could get the results that way, since I was printing them in the log. Interestingly enough, the log was base64 encoded and had to be decoded to read.

But after printing the $result->get(‘Payload’)), I was able to find the results of the call.

This is a slow call. I’m assuming that’s because this is an ‘on demand’ service. But we will be making several of these at a time so I’m hoping the successive ones will be faster.

Using JdbcTemplate in Spring Boot to Insert a Record and Return a ID

There is more than one way to skin a cat (pardon to my cats). In fact, to insert a record into a database within Spring Boot, I found at least 6 ways:

  • StoredProcedureQuery
  • Prepared Statements (with various flavors)
  • Callable Statements (with various flavors)
  • JdbcTemplates
  • JdbcTemplates with Prepared Statements
  • JdbcTemplates with Callable Statements

There were probably more. But I didn’t save my search history to find them all again.

I have an unique situation in which I’m working. The database on the backend is Microsoft SQL Server. The insert statement is using a Stored Procedure. And the stored procedure is returning the record id by calling @@IDENTITY itself.

Oftentimes, when one is working with MSSQL, one is working with the entire Microsoft stack, which includes some flavor of .Net. But the client wanted to have all their middleware code standardized to Spring Boot. Not a big deal, except for the fact that there were existing Stored Procedures to work with, not the database tables directly.

This has provided a few unique challenges. Rather than using Spring Boot’s ready-made method for automatically creating models for databases, the models had to be created by hand. And I learned early on that, when using StoredProcedureQuery, ‘column names’ wouldn’t work: the parameters had to be entered in the order expected by the stored procedure, and indices used instead.

That last item took a day to figure out.This latest issue took just about as long. And hopefully, some poor soul will find this post to aid in their quest for the same information.

That problem was inserting a record and returning the new id for that record. The first problem was dealing with null values. StoredProcedureQuery had been infinitely useful when running stored procedures that extracted data. It became almost cookie cutter to create the code:

StoredProcedureQuery query = [EntityManager].createStoredProcedureQuery("[stored procedure name]", [Model class].class);
query.registerStoredProcedureParameter([index], [typeclass].class, ParameterMode.IN [or] ParameterMode.OUT);
query.setParameter([index],[value]);
return query.getSingleResult(); [or] return query.getResultList();

But this wouldn’t work for inserts. Initially, my problem with inserts was that they could contain null values. StoredProcedureQuery didn’t like null values. And, after much research and trial and error, I found that JdbcTemplate was my friend. By using JdbcTemplate, I could add null parameters and the code wouldn’t choke on me. Problem was, JdbcTemplate.update, which I was using, would return the number of records affected, but not the new ID, if a record was being inserted. Thus began my long search for something else that would work.

The popular response in Stack Overflow was to use:


KeyHolder holder = new GeneratedKeyHolder();

I couldn’t make that work. I’d get errors because ‘nothing’ was being returned.

I checked all the other options on JdbcTemplate, since that still seemed my best option for accomplishing this (since I might have nulls in the insert parameters). I literally would check the documentation for each option, then Google to see how they were used.

I finally came across the documentation for CallableStatement. It is passed as a parameter in a call from JdbcTemplate, so my null values could be handled. And it allowed a return value to be ‘registered’ for retrieval. That is, since I was not retrieving a value with a column or variable name, I could set one in order to find the value after the call had been made.

My thanks to these two sources to helping me out:

http://www.java2s.com/Code/Java/Spring/ImplementsCallableStatementCreator.htm
http://forum.spring.io/forum/spring-projects/data/239-jdbctemplate-call-example

Here’s the basic syntax that I ended up using:


import java.sql.CallableStatement;
import java.sql.Connection;
import java.sql.SQLException;
import java.sql.Types;
import java.util.ArrayList;
import java util.Map;

import org.springframework.jdbc.core.CallableStatementCreator;
import org.springframework.jdbc.core.JdbcTemplate;
import org.springframework.jdbc.core.SqlOutParameter;
import org.springframework.jdbc.core.SqlParameter;

// note: I did have to list all my input and output parameter types, unlike in
// the examples where the list only included the output type
List out = new ArrayList();
out.add(new SqlParameter(1, Types.NVARCHAR));
out.add(new SqlParameter(2, Types.INTEGER));
out.add(new SqlOutParameter(“id”,Types.NUMERIC));

Map<String, Object> returnList
= getJdbcTemplate().call(new MyCallableStatementCreator(params), out);

…..

class MyCallableStatementCreator implements CallableStatementCreator {

private ParamModel params;

public MyCallableStatementCreator(ParamModel param) {
this.params = params;
}
@Override
public CallableStatement createCallableStatement(Connection con) throws SQLException {
// note: I received an error until I put the brackets around the call, and the word ‘call’ was required
CallableStatement stmt = con.prepareCall(“{call my_stored_procedure(?,?,?) }”);

stmt.setString(1,params.getFirstVal());
stmt.setInt(2, params.getSecondVal());
stmt.registerOutParameter(3, Types.INTEGER);
return stmt;
}

Creating a Portal Template for Oracle WebCenter 12c

Oracle WebCenter 12c uses a different paradigm than OWC 11.X used. In 11.x, the portal site could be completely created within JDeveloper. OWC 12 seems to expect most of your structural changes will be made within their interface. But that ‘making’ is difficult. You can modify a template. But that doesn’t mean modifying the header or footer. To do that, you still need JDeveloper.

My thanks to the sources listed below, that finally put me on the right track with this project.

Start in JDeveloper by creating a WebCenter Portal Asset Application.  Once you reach the Portal Asset properties page, select Portal Template. For more details, including screenshots, see Peter Hemesath’s blog post.

JDeveloper will open up a graphic representation of your portal template. Modify it as you wish.

Graphics apparently can’t be included with the template. Those will need to be added separately to the Content Server. Log into the WebLogic Content Server. Click on New Check-In at the top. Select Digital Media – Audio, video and images. Complete the rest of the form and upload your item.

Oracle WebCenter Content Check-in

Once you complete the upload, you’ll be shown the information and a link. Use that link in your template to insert the graphic. If you ‘lose’ the link, you can find it again by selecting Browse at the bottom of the screen, then selecting Folders and following the path where you put the item.

Oracle WebCenter content details

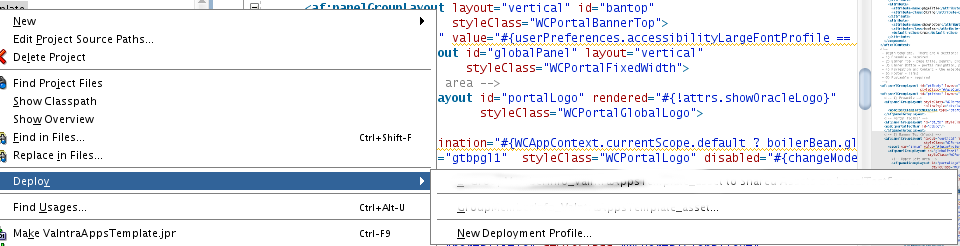
When your template is completed, right-click on the project name and select Deploy/New Deployment Profile.

JDeveloper Deployment

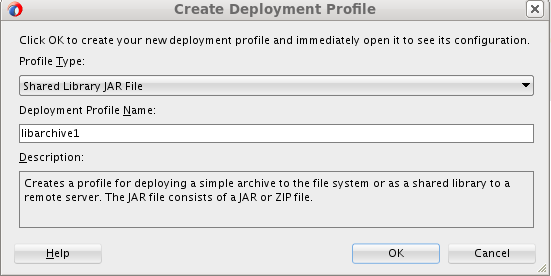
In the first dialog, select Shared Library JAR File.

Oracle WebCenter Shared Library Archive

The rest is pretty intuitive.

Once you deploy your archive, you’ll be able to see it as a template choice.

Oracle WebCenter Portal Templates

Each time you make a change, you simply upload the template again and the changes will be reflected in the portals for which you selected that template.

References:

Amey G. In answer to query on: https://community.oracle.com/thread/3928194

Hemesath, Peter. Developing WebCenter Portal Assets for 12c. Retrieved 23 August 2016 from http://phwebcenter.blogspot.com/2015/11/developing-webcenter-portal-assets-for.html

Oracle. Developing WebCenter Portal Assets and Custom Components with Oracle JDeveloper. March 2016. E48260-05.